There was a time when we had to learn coding or hire a professional, then buy a domain and purchase hosting before our regular website could be created and published.
However, in today’s time, we can create a professional-looking website using AI platforms like Codedesign. But, are they worth it?
Today, we will review one of them for you – Codedesign.ai – and see if it is worth the investment, as well as possible alternatives.
We purchased a paid plan, created a few websites and tested the features, and we are now ready for a detailed review. Let’s get started!
Introducing CodeDesign.ai
CodeDesign.AI is an AI website builder.
According to their claims, with its AI-generated UI elements ad designs, you can effortlessly generate UI components based on your prompts, simplifying the design process.
Thanks to its smart suggestion system, creating beautiful designs becomes a breeze, as the AI Assistant recommends relevant UI elements and content. Plus, customization is a snap with options to tweak colors, fonts, and layouts to align with your specific requirements.
Introducing our Tester and Reviewer
Hi everyone, I’m Nirav, and as we all already know, having a website is super important whether you’re starting out as a freelancer to get new clients, looking to build an ecommerce website, aiming to grow your online presence for your brick and mortar business, or just want to start your blog.
We purchased a paid plan at Codedesign.ai, and I personally tried to build a few websites and tested their features.
In this article, I will review show you a step-by-step process of how to create a professional website using this AI tool called codedesign.ai. And, in just a few minutes, have a website that you can connect with your own domain and publish on the internet.
We will also see the pros, cons, and alternatives.
Quick Overview

Let’s Jump in!
Surely, CodeDesign.ai gives you a head start in website creation by saving you a significant amount of money and especially, time.
With this tool, you can construct professional websites 10 times faster with the help of AI, and the process is incredibly straightforward. Allow me to highlight a few of the features offered by CodeDesign.ai.
Firstly, you can create your website entirely using AI. AI will generate the copy, images, and all the content, as well as different pages autonomously. Additionally, you have access to a user-friendly drag-and-drop editor provided by CodeDesign.ai, allowing you to fully customize your website and elevate it to the next level.
You also gain access to premium widgets, but with all these design elements, you might find yourself overwhelmed. To address this, CodeDesign.ai allows you to preview the complete website for free before making any final decisions.
Enough of my explanation; let me demonstrate how to use CodeDesign.ai to create your website.
Step-by-Step Guide to Using CodeDesign.ai for Website Creation

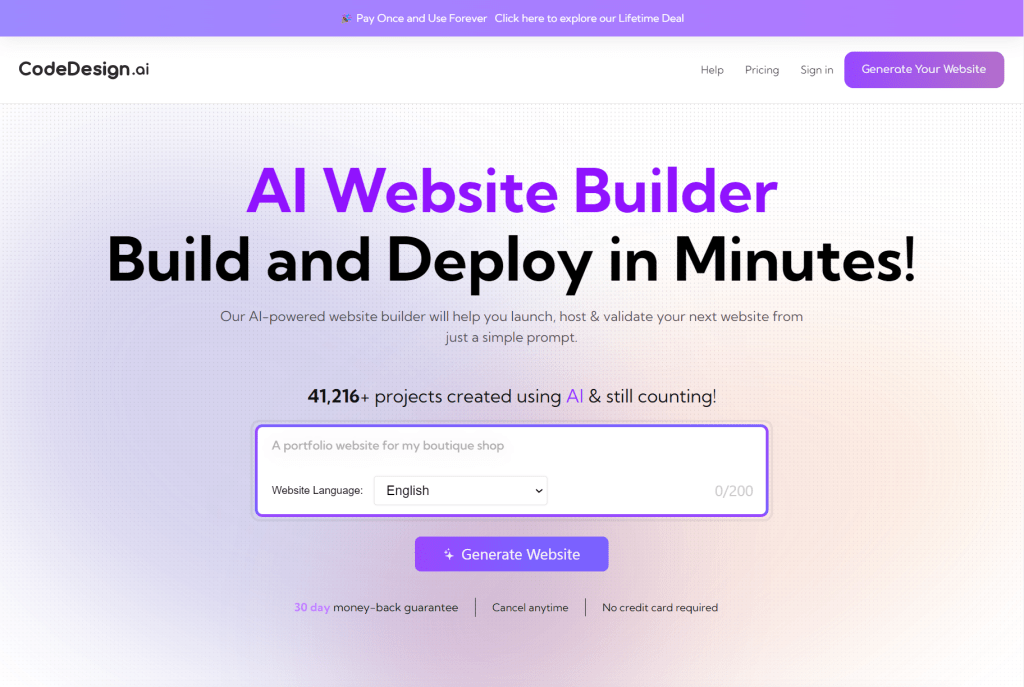
#1 Open CodeDesign.AI in your Browser
Begin by opening www.codedesign.ai in your web browser, the platform where you can build your website using AI.
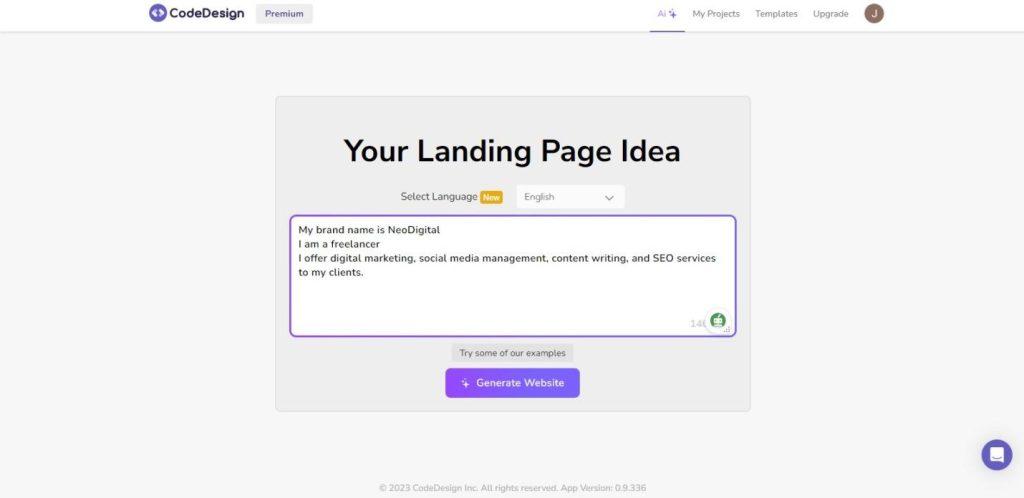
#2 Enter references for your website you are about to create with AI (few seconds)
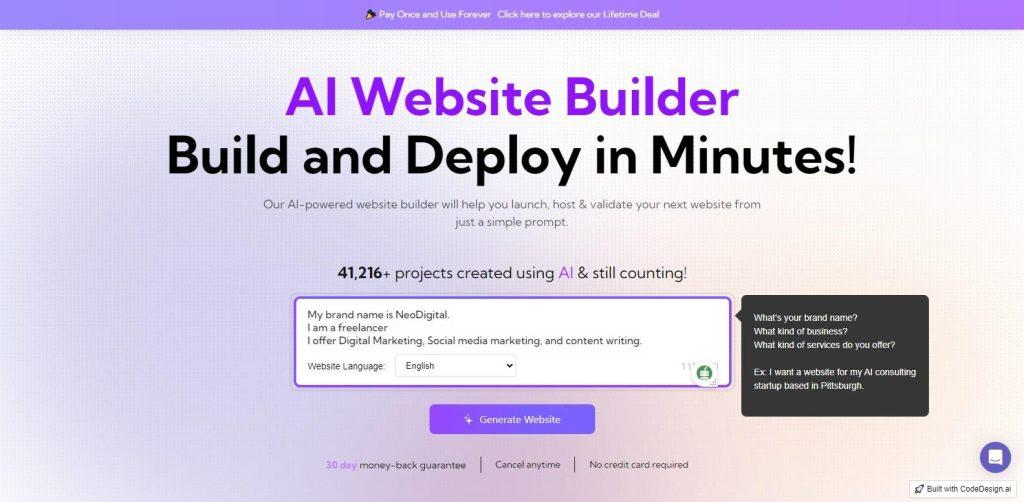
Click on the white text box to start entering details about your brand, business, products, and services. Then, click the ‘Generate Website’ button. As an example, I will create a freelancing website offering SEO, Digital Marketing, Social Media Marketing, and content creation services.
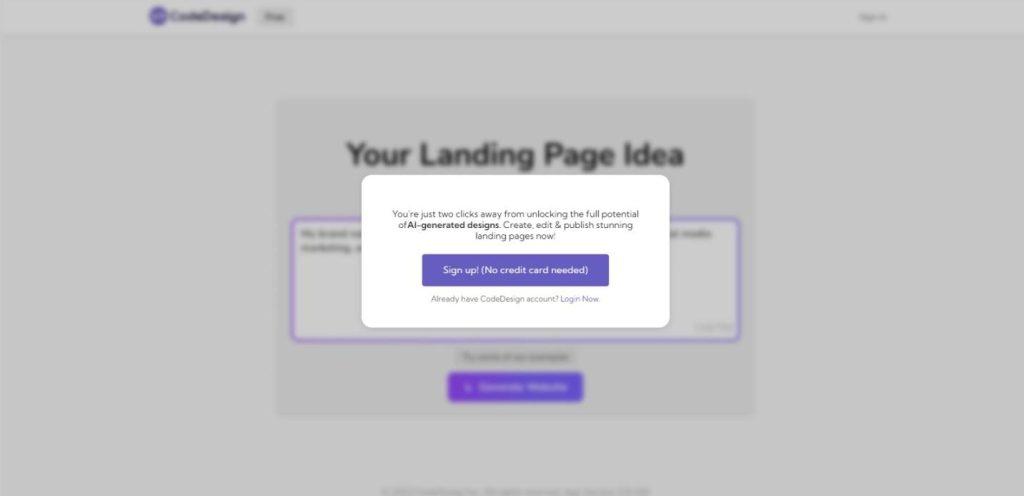
#3 Generate Website
As you can see, after providing all the required details, when you click on the ‘Generate Website’ button, the system will prompt you to create your account on codedesign.ai.
In our case, I used a paid plan, however you can start for free.
#4 Sign Up on CodeDesign.ai
Signing up is free, and you can access most features with a free account. However, codedesign.ai offers competitive pricing plans suitable for various needs, from beginners to enterprises. Refer to the pricing table below for details.
Basic Plan
-
Custom domain for 1 website
-
20 subdomain websites
-
Unlimited pages/project
-
1 user/project
-
Form requests (1000/project/mo)
-
SEO optimized pages
-
Remove CodeDesign branding
-
Email & chat support
Growth Plan
-
Custom domain for 1 website
-
Unlimited subdomain websites
-
250 AI website generations
-
300,000 vistors / month
-
Unlimited pages/project
-
50 export page credits/month
-
20 users/project
-
SEO optimized pages
-
Form requests (6000/project/mo)
-
Remove CodeDesign branding
-
Dedicated customer success manager
Standard Plan
-
Custom domain for 1 website
-
100 subdomain websites
-
100 AI website generations
-
100,000 vistors / month
-
Unlimited pages/project
-
20 export page credits/month
-
5 users/project
-
SEO optimized pages
-
Form requests (2000/project/mo)
-
Remove CodeDesign branding
-
Priority support
#5 Pricing Plans
Codedesign.ai offers a 30-day money-back guarantee with every plan, allowing you to cancel within this period.
As a digital agency, we highly appreciate this tool for its feature-rich capabilities. We have opted for the top-tier plan, to meet our specific requirements.
Whether you’re new to CodeDesign or returning to explore its latest features, you can try it for free and get started within minutes. Let’s move on to our second step.
#6 Witnessing the Magic
After signing up, in the next window, you will encounter a prompt box where you’ve already entered details about your brand, business, products, and services. If needed, you can still edit this content to align with your specific requirements.
Even if you’re unsure about how to create a prompt for the AI, CodeDesign has made it user-friendly.
Simply click on the ‘Try some of our examples‘ option, replace the basic details with your own, and click the ‘Generate Website‘ button. Watch the AI perform its magic in seconds.
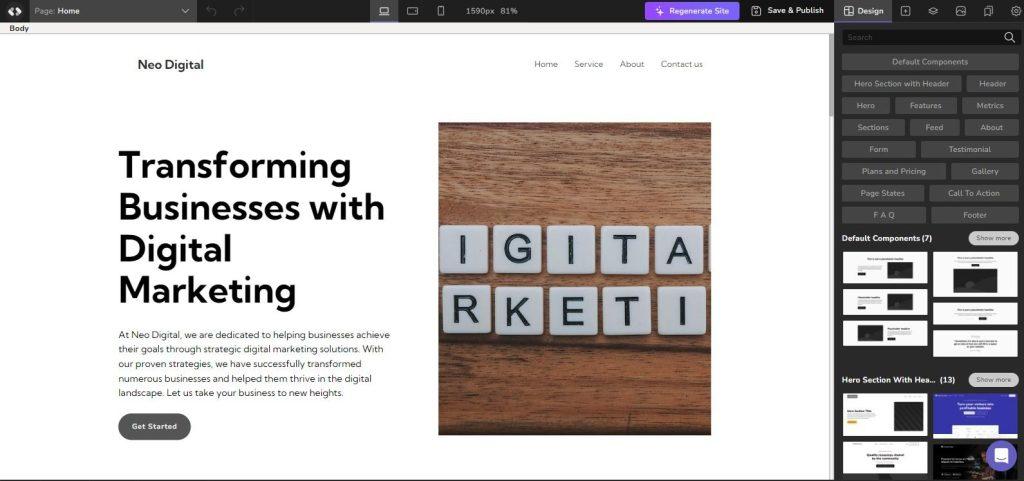
#7 It will regenerate for you
In just a few seconds, the landing page of your website will be ready for you. As you can see below, it has created a beautiful landing page for me. If you don’t like the layout it has generated, you can regenerate the landing page by clicking on the ‘Regenerate Site‘ option at the top.
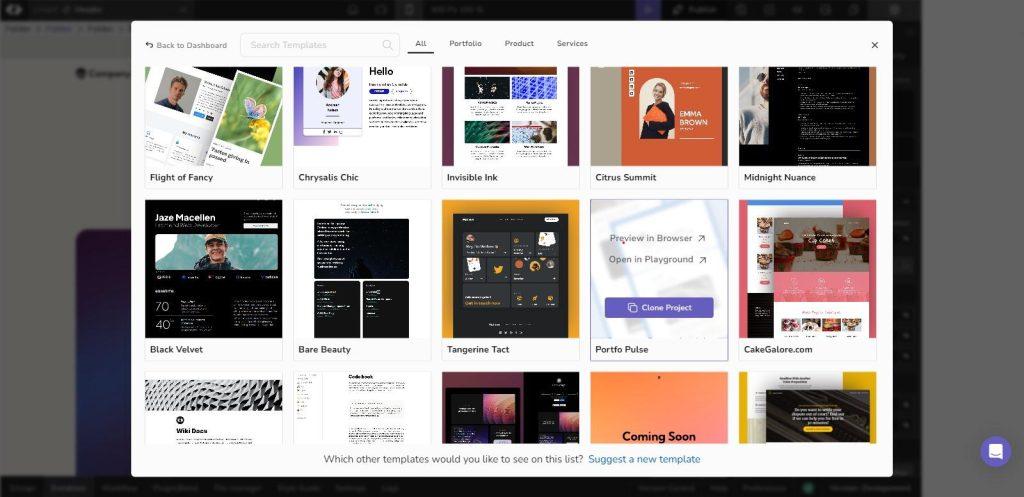
#8 Choose pre-made Templates
Another great feature I’ve discovered in this tool is that if you prefer not to use the AI prompts to create your site, CodeDesign offers a large library of pre-made templates that you can use for your website. To access them, simply click on the ‘Template‘ tab in the menu. You can preview the templates in your browser and choose the one that best suits your website.
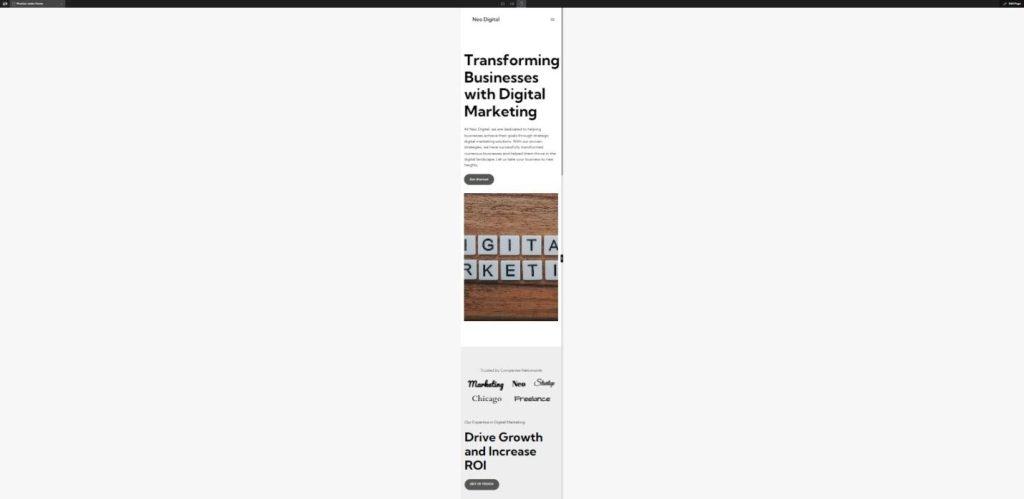
As you can see, it not only prepares the layout but also generates the website’s content and images, also ensuring that the website is mobile-friendly. This is particularly important since many people primarily access websites using their mobile phones.
I am very happy with the current design that CodeDesign has created for me using its artificial intelligence. Now, let’s explore how we can edit this page and also create a new page using the various elements provided by CodeDesign.
CodeDesign gets that every website’s got its own style. In CodeDesign’s Design Workspace, you can totally customize and fine-tune the AI-made design. You can mess with the layout, play around with colors, fonts and more, to give it a fully unique look.
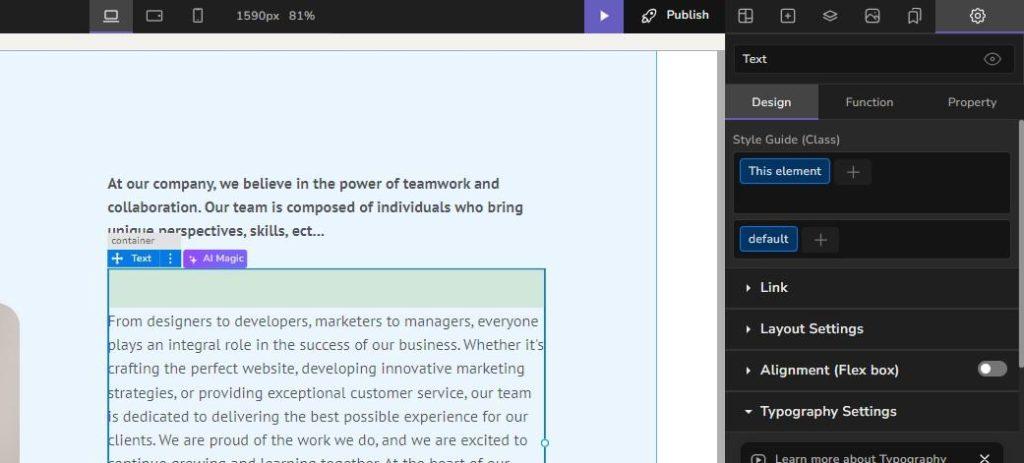
#9 Get started with editing your text content
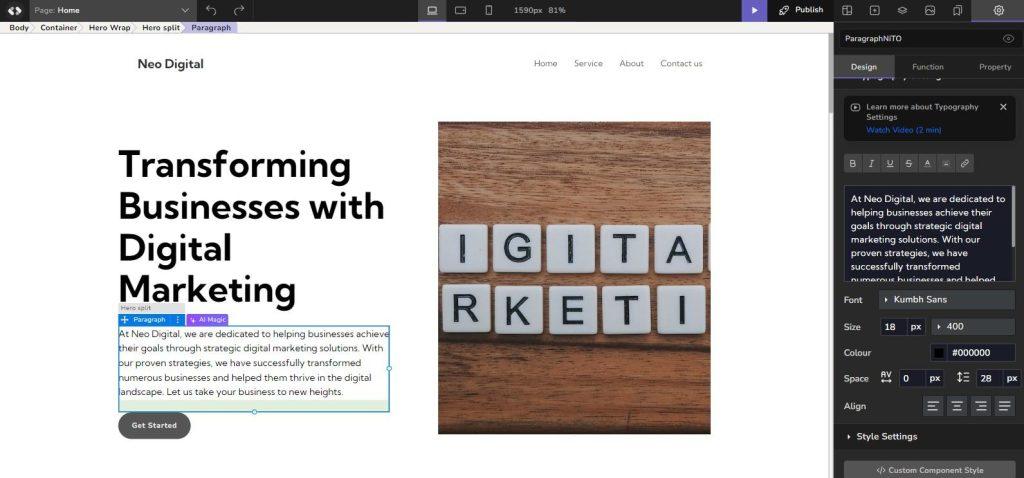
Here is how you do it:
- Click and select the text element you want to change. You’ll see a text box appear around it, and on the sidebar, you’ll find all the tools you need to make your edits. This means you’re in text-editing mode and all set to make your text shine.
- Just start typing to replace the current text with your own words using the text box in the sidebar. You can use your keyboard to add, remove, or tweak anything you like.
- CodeDesign offers various formatting options to jazz up your text’s appearance. Play around with different fonts, sizes, and colors to create a text style that catches the eye. You’ll find these options in the text editing toolbar.
- For that perfect look, adjust how your text lines up and the space around it. Whether you want it left, center, or right-aligned, CodeDesign has you covered. Plus, you can fine-tune line spacing, letter spacing, and paragraph indentation for precise control over your text layout.
- Once you’ve polished your text to perfection, simply click anywhere else on the canvas to wrap up the text-editing process. Your changes will be applied, and your text will look exactly as you want it to. Now, you can preview your website and see your edits in action in real-time.
#10 Give a fresh look to you website
You can also replace images on your own or use images from the CodeDesign integrated royatly-free image database.
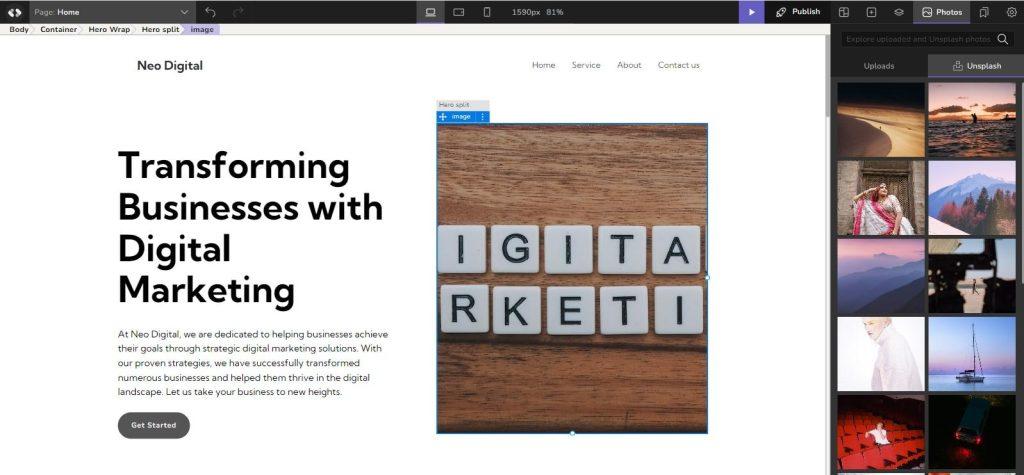
Updating images in your CodeDesign project is incredibly easy! To give your project a fresh new look, follow these simple steps:
- Click on the image you want to update within your project canvas.
- Access Image Settings: On the sidebar, locate the image settings related to your selected image.
- Click on the ‘Replace Image‘ button on the sidebar. You can choose an image from your existing project gallery, upload a specific image file from your device, or explore and select an image from the Pixabay/Unsplash gallery.
- Once you’ve made your selection, it will seamlessly replace the previous image in your project.
That’s it! You’ve successfully given your CodeDesign project a rejuvenated appearance.
#11 Check other useful elements
Also, if you want to add some cool features, simply use the drag-and-drop tool to easily insert extra sections or whatever you need to enhance your website’s appeal for users. It’s a breeze!
CodeDesign has an array of ready-to-use design elements! I’m talking about useful features like headers, hero sections, and impressive testimonials – all professionally designed and ready for action.
All you need to do is select the one you prefer from the Components panel and drag it onto your canvas. And guess what? You can easily customize it to align with your unique style and content.
With CodeDesign’s incredibly convenient elements and these pre-designed components, you won’t just save time, you’ll also make your website look fantastic without needing the skills of a pro 🙂
#12 How to add a new page in your website
Now let’s see how can add and create a new page to your website.
In CodeDesign, the process of building multi-page website is straightforward and easy.
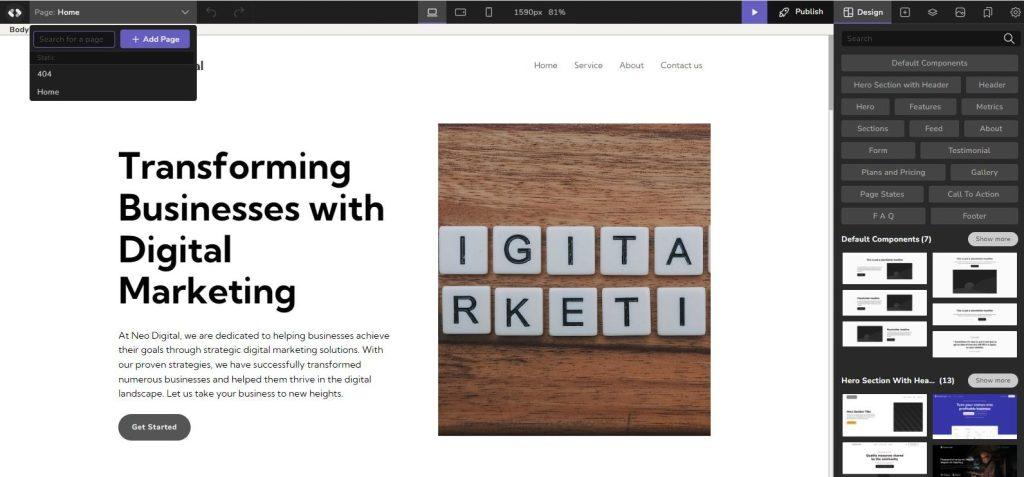
- To add a new page, for example “About Us” page, simply navigate to the left side of your header section, where you’ll find the pages dropdown menu. Click on it to reveal a set of options.
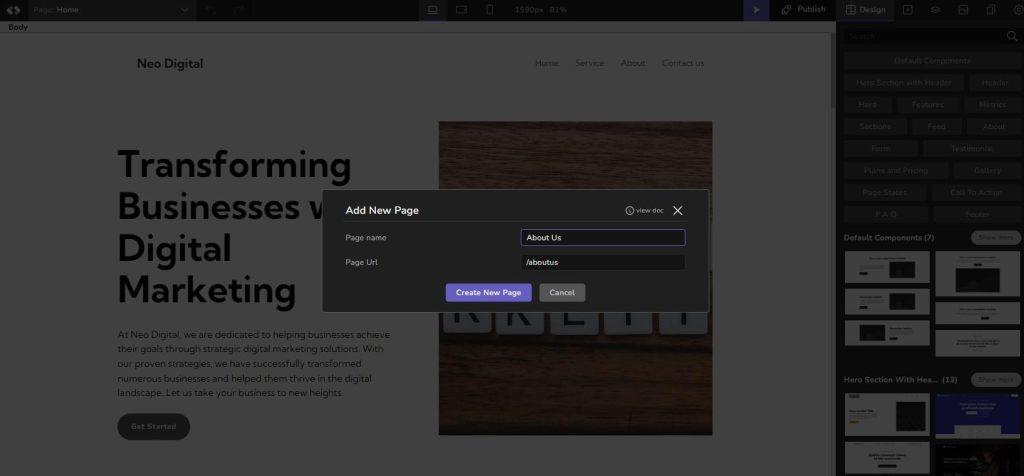
- Once the pages menu is open, locate and select the “Add Page” button. This action will prompt the system to create a new blank page for your project.
- With the new page created, it’s essential to give it a meaningful name that reflects its purpose or content. This name will help you easily identify and manage your pages later on.
- After naming your new page, simply click the “Create New Page” button. CodeDesign will instantly generate the new page, and it will be seamlessly integrated into your website.
By following these simple steps, you can efficiently expand your website by adding multiple pages tailored to your specific needs. Whether you’re creating a complex website or a simple portfolio, CodeDesign makes it simple to manage and organize your content with ease.
#13 Preview Your Work
To take a sneak peek at your creation, either after completing your project or just to check how your page is shaping up, you’ve got the preview button.
Located in the top-right corner of your screen, the preview button grants you the privilege of seeing your page before exporting it.
When you click this button, a new tab will open with your preview. What’s exciting is that all live changes you make will be updated in real-time on the preview, eliminating the need to refresh your pages to see the latest updates! So, it’s a seamless experience from design to preview. Enjoy!
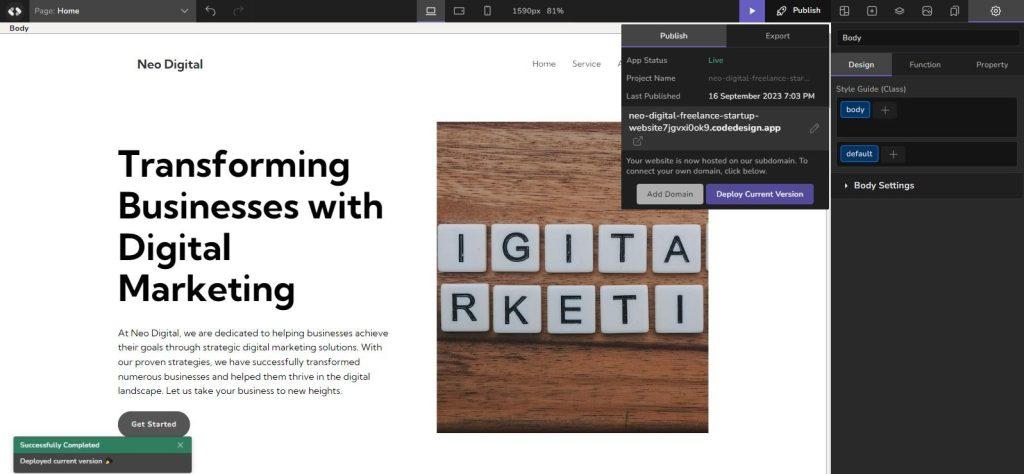
#14 Deploy it
After reviewing and fine-tuning your webpage or app, the natural next step is to deploy it! Wondering how to do that? Just follow these straightforward steps:
- When you’re ready to launch, locate the “Publish” button in the top right corner of your screen, right next to the preview button.
- Click on “Deploy Current Version” in the next tab that appears, and voilà! It’s done! Your project is now successfully deployed to a CodeDesign subdomain… or custom domain, if you connected your own domain. We’ll show you later how to do that.
#15 Connecting a Custom Domain to Your Project
Now, if you want to link your page to a domain you already own, here’s what you need to do:
- Click on the “Publish” button, located on the top-right side of your screen.
- Then, select “Add Domain” on the tab that appears.
- Enter your desired domain name in the provided blank space.
- Click on “Connect Domain.”
You’ll be presented with the DNS record data that you need to add to your domain’s DNS settings. You’ll have to update this information from within your DNS Provider’s administrative console. This will be your domain registrar.
That’s it! You’re on your way to deploying your project and connecting it to a custom domain like a pro.
So, I’ve gone through all the important aspects of this amazing AI tool, CodeDesign.ai, where you can create a website using AI in just a few seconds. Let me tell you, it’s pretty awesome!
But, my opinion is not the only one that matters. In the next section, we will take a look at the online reputation and reviews of this tool, as well as pros, cons and alternatives in case you are not convinced about this specific AI website builder 🙂
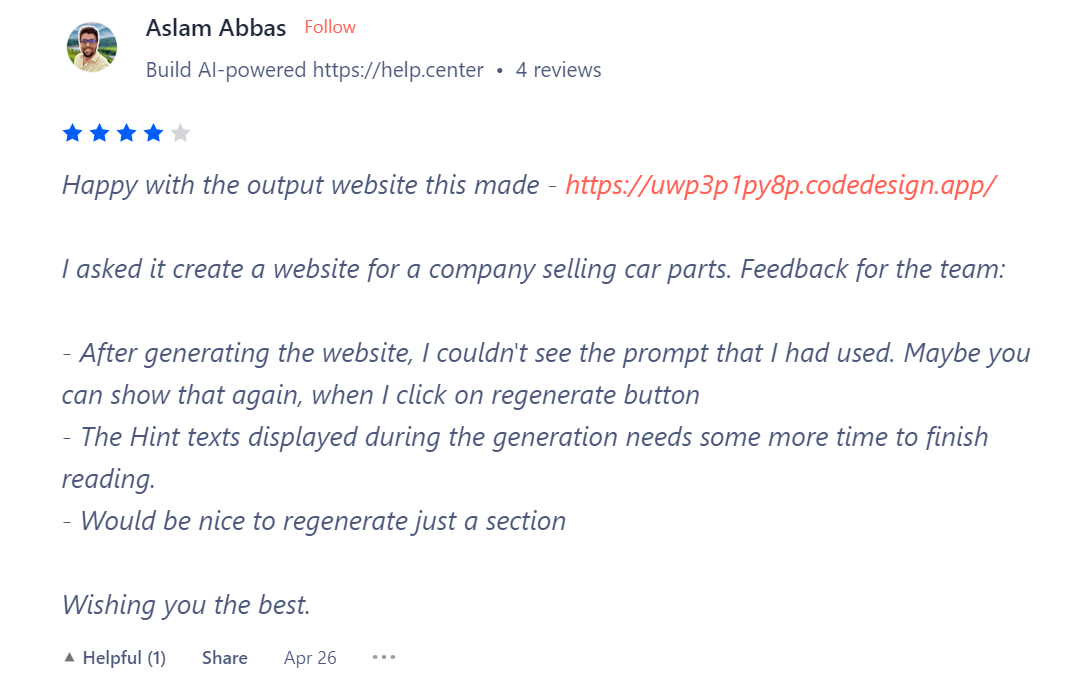
Users Review

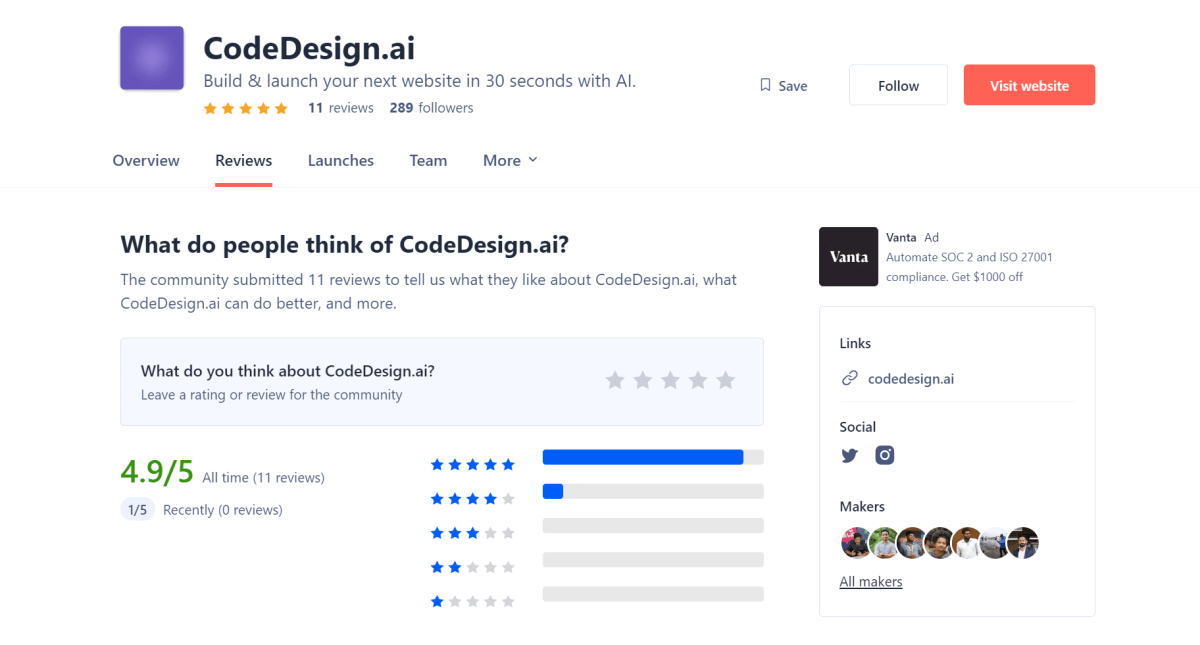
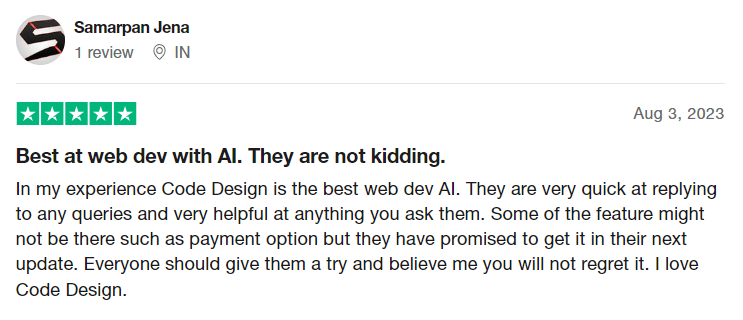
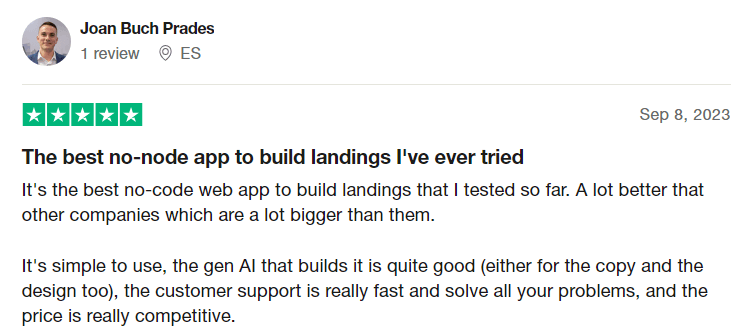
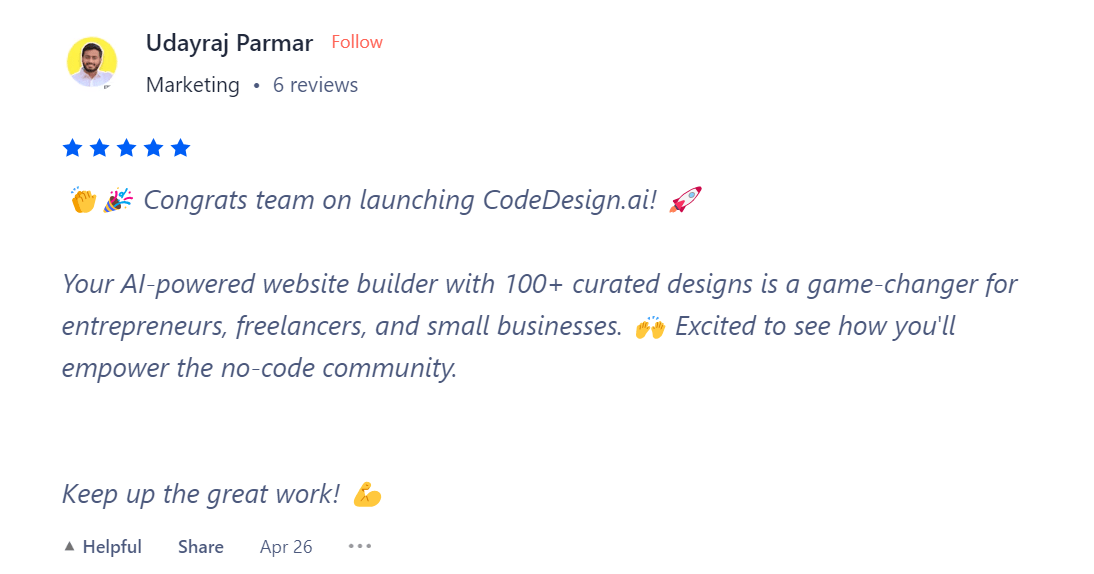
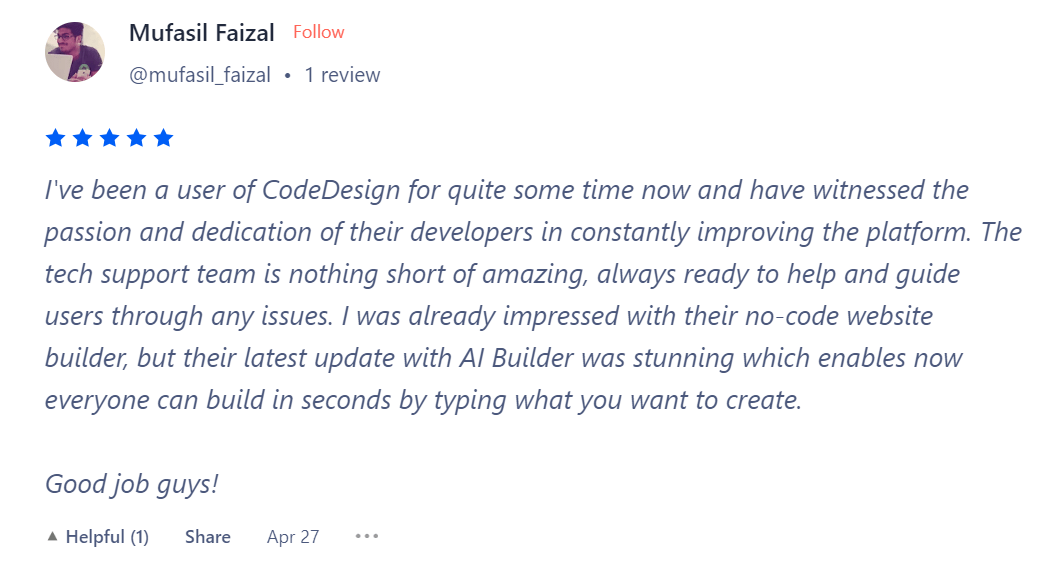
So let’s see what the user opinion is about this AI tool on Trustpilot and Producthunt, with a 4.9 rating out of 5. Well, it stands as tall as Everest!
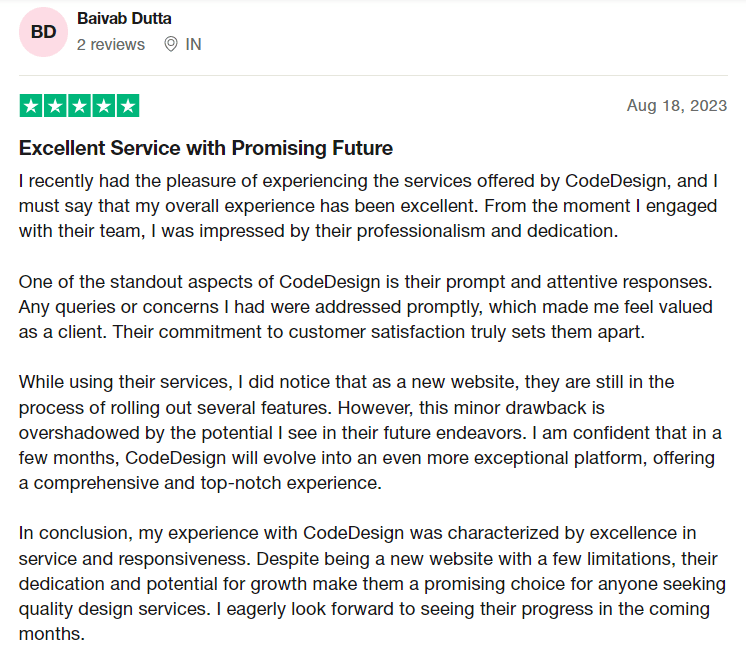
We also selected a few users’ reviews which we liked and that resonate with what we think of CodeDesign.ai.

PROS & CONS
PROS
- AI-powered instant website design: Simply provide some details about your dream website, and CodeDesign.ai will generate a full website for you.
- Drag-and-drop interface: It makes post-editing and customization simple without coding knowledge. Simply drag elements onto the page until you achieve the desired layout.
- SEO Optimization & Fast Loading: CodeDesign.ai optimizes websites for search engines so they're more likely to rank well in search results.
- Affordable Pricing: Compared to similar AI website builders, CodeDesign AI boasts one of the lowest pricing plans.
CONS
- Limited Customization Options: CodeDesign.ai provides various customization options, such as design and layout customization ; however, more advanced customization are lacking and may not be suitable for every user.
- Limited integrations: With third-party tools and services, which may limit its usefulness for some users.
Here's a rundown of what I liked the most

- AI-Generated UI Elements & Designs: One of the coolest features is the AI-generated UI elements and designs. You can literally create UI components just by providing prompts. It’s like having a design genie in a bottle!
- Smart Suggestion System: CodeDesign’s AI Assistant is like your personal design consultant. It suggests relevant UI elements and content to make your designs look stunning. It’s like having a friend who always knows what looks good!
- Easy Customization: You can further tweak your designs to match your unique style. Whether it’s changing colors, fonts, or layouts, you’re in control. It’s like having a canvas and a palette to create your masterpiece!
- Quick Preview: With this, you can see your design in action, visualize the final product, and make real-time adjustments. It’s like trying on clothes before you buy them – super handy!
And just to reiterate, I give CodeDesign.ai a 4.5-star rating after this review!
Alternatives
Click here for a list of he best AI website builders, which can be good alternatives to Codedesign.AI.
On top of the above list, here are a few notable mentions.
- Unbounce – This AI website builder is for creating exciting and attractive Landing pages as fast as light via AI. It has a lot of integrations, however, it is quite costly with pricing starting at $99 per month.
- 10Web – This is possibly the most popular AI website builder right now. It allows you to create a professional website just by using AI. However, is also among the most expensive.
- Framer – It’s an easy and user-friendly AI website builder for creating your website. The navigation and the Drag-and-drop are smooth and seamless.
And, we have two more great website builders which can be a good alternative to CodeDesign. While these builders won’t allow you to create a website just by using AI, they can be easily used by non-coders. These are:
- Wix – One of the most famous website builder and it’s a go-to option for those non-coders. It’s the second most used CMS, just after Wordpress. While it does not leverage AI to build a website fully in autopilot, it has an easy-to-use builder with AI text prompt integration.
- Jimdo – A great and responsive website builder, and it’s free too. If you’re willing to go for enhanced features, then you might upgrade to the paid plans, but that’s also affordable. Here, not only you have a website builder, but you can also create logos. To discover more details about this website builder, don’t forget to check our full Jimdo review.
However, as you have seen from our review and testing, CodeDesign left us satisfied. Plus, it has some of the most competitive pricing plans on the market of AI website builders,
FAQs

Is Codedesign.ai legit?
Yes, Codedesign.ai is a legit site, operated by an american company located in USA, Delaware, and with over 10 employees.
Is there a free trial available for CodeDesign.ai?
Yes, Codedesign offers a free trial.
What are the benefits of using CodeDesign.ai?
Benefits of CodeDesign.ai include building, deploying, and exporting web pages 91% faster, without writing code. Codedesign leverages AI to fully build a website based on a single prompt.
Can I collaborate with others on CodeDesign.ai?
Yes, the Collaboration option is available on Codedesign; you can collaborate with other users on the interface, without sharing credentials.
Does Codedesign.ai have a Lifetime deal?
Currently, Codedesign lifetime deal is no longer available. However, subscribe to our newsletter and we’ll let you know once it’s out again!